How to Set Up Surround Sound: A Practical Step-by-Step Guide
Recommended picks


Choose Your Channel Layout Before You Buy Anything
A 5.1 system gives you a front-left, center, front-right, two surround speakers, and a subwoofer. That is the format Dolby Digital and DTS were built around, and it works well in rooms from 150 to 400 square feet. A 7.1 layout adds two rear-surround speakers, which helps in larger rooms where the 5.1 rears feel too far apart. Dolby Atmos requires a 5.1.2 or 5.1.4 layout, meaning you add overhead or upward-firing elevation speakers on top of the base 5.1 array. If your room is small or you cannot run cables to the back wall, a 3.1 or 2.1 setup with a quality subwoofer still beats a flat TV speaker setup by a wide margin. Pick the layout first, then match your speaker purchase to it.
Speaker Placement: Angles, Height, and Distance
For a 5.1 layout, place the center channel directly above or below your TV, aimed at ear level from your seated position. Front-left and front-right speakers go at roughly 22 to 30 degrees off-axis from center, also at ear level. Surround speakers in a 5.1 setup belong at 90 to 110 degrees to the side of your listening seat, mounted about two feet above ear level. In a 7.1 system, the side surrounds move to 90 degrees and the rear surrounds go at 135 to 150 degrees. The subwoofer is less position-sensitive because bass frequencies are largely non-directional, but placing it in a front corner of the room tends to give the most even low-end. Keep all speakers roughly equidistant from the main listening seat if you can, because auto-calibration compensates for distance in software rather than physics.
Wiring and Connecting Your System
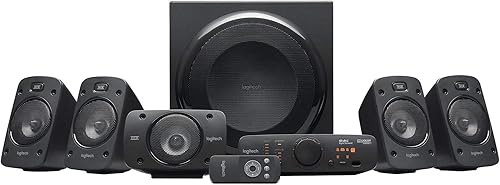
Most passive surround speakers use bare speaker wire with binding post terminals. Strip about half an inch of insulation, twist the strands tight, and seat them firmly in the gold-plated terminals, keeping positive (red) and negative (black) consistent across all speakers. A system like the Klipsch R-41SA, rated at 100 W and sold around $160, uses single gold-plated binding posts per speaker, so the connection process is straightforward. Run HDMI ARC or eARC from your TV to your AV receiver so that TV audio passes through the receiver to your speaker array automatically. If your TV only has optical output, use that instead, but note that optical does not carry lossless Dolby TrueHD or DTS-HD Master Audio. For all-in-one powered systems with their own amplifier, such as the Logitech 980-000467 (a 5.1-channel system, $402.99, rated by over 5,900 buyers at 4.5 stars), the satellite speakers plug directly into a control pod or powered subwoofer, removing the need for a separate receiver entirely.
Running Auto-Calibration
Nearly every AV receiver made in the last decade ships with a microphone and an automatic calibration routine. Place the calibration mic on a stand at your primary listening seat at ear height. Follow the on-screen prompts, which will play test tones through each speaker in sequence. The receiver measures the distance, volume level, and frequency response of every driver and sets crossover points automatically. After the first calibration pass, check the speaker size assignments: speakers with drivers smaller than five inches should be set to "Small" so bass frequencies redirect to the subwoofer. Correct any speaker that was misidentified. Then re-run calibration one more time. This two-pass approach catches the most common errors.
Setting the Subwoofer Crossover and Level
The crossover frequency determines which frequencies the subwoofer handles versus your main speakers. Most home theater setups work well with a crossover between 80 Hz and 120 Hz. If your main speakers are bookshelf-sized with small drivers, use 100 to 120 Hz. Larger floorstanding speakers with eight-inch or bigger woofers can cross over lower, around 60 to 80 Hz. Set subwoofer level so bass is felt and present without calling attention to itself. The subwoofer should reinforce action and music, not override dialogue. A well-calibrated system like the Klipsch 1069177, a 5.1.4-channel array priced around $549 with 614 reviews at 4.6 stars, is designed with matched crossover points across its full speaker complement, which makes this step easier when the whole array comes from one manufacturer.
Final Checks Before Your First Movie
Walk through this checklist before you sit down: confirm all speaker terminals are tight with no wire strands touching adjacent terminals; check that your TV is set to pass through Dolby Digital or Dolby Atmos via HDMI ARC and not downmixing to stereo; verify the AV receiver input is set to the correct HDMI or optical source; and play a calibration disc or a streaming title with a known Atmos or DTS track to confirm all channels fire. Listen for the center channel carrying dialogue clearly, side surrounds producing ambient effects, and the subwoofer rolling in on low-frequency events without distortion. If one channel is silent, reseat the speaker wire at both ends before assuming a hardware fault. Questions? Reach out at hello@hometheaterbuilder.com.
Common mistakes to avoid
- Placing surround speakers directly beside or behind the seat rather than at the correct side angle, which collapses the soundstage.
- Running calibration before all speakers are installed and wired, which means absent channels get no correction data.
- Setting all speakers to 'Large' in the receiver menu, which starves the subwoofer of content and can overdrive small satellite drivers.
- Using optical cable from the TV when the receiver supports HDMI ARC, losing lossless audio formats in the process.
- Mounting surround speakers at ceiling height instead of two feet above ear level, which pushes surround effects up out of the listening plane.
- Skipping the second calibration pass after verifying speaker size assignments, leaving the first-pass errors in place.
Frequently asked questions
Do I need an AV receiver, or can I use a powered all-in-one system?
Both work, but they suit different situations. A separate AV receiver paired with passive speakers gives you more flexibility to upgrade individual components and typically supports a wider range of audio formats. A powered all-in-one system, like the Logitech 980-000467 at $402.99 with its 5.1-channel layout and over 5,900 ratings, simplifies setup because everything is pre-matched and amplified. If you are new to home theater or want a single-box solution, the all-in-one route is a practical starting point.
What is the difference between 5.1 and 7.1 surround sound?
A 5.1 system uses five speakers (front-left, center, front-right, and two side surrounds) plus a dedicated subwoofer. A 7.1 system adds two rear-surround speakers behind the listening seat, totaling seven full-range speakers and one subwoofer. The extra rear channels fill in the space behind you more precisely, which matters most in rooms wider than 15 feet. In smaller rooms, the added speakers can create a muddied rear field rather than improving clarity.
How do I know if my TV supports Dolby Atmos passthrough?
Check your TV settings under audio or sound output and look for an option labeled HDMI ARC, eARC, or Dolby Atmos. eARC (enhanced Audio Return Channel) is required for full lossless Atmos passthrough. If your TV only has standard ARC, it can still pass Dolby Atmos in the compressed Dolby Digital Plus format, which most people find indistinguishable from lossless. Optical output cannot carry Atmos at all, so if Atmos support matters to you, HDMI eARC is the connection to use.
Can I add Dolby Atmos to an existing 5.1 system?
Yes, by adding upward-firing Atmos elevation modules that sit on top of your existing front-left and front-right speakers. These bounce sound off the ceiling to simulate overhead audio. The result depends heavily on ceiling height and surface material, with flat ceilings between eight and ten feet working best. Alternatively, a system like the Klipsch 1069177 (5.1.4 channels, $549, 4.6 stars across 614 ratings) is designed from the ground up for Atmos, which avoids the ceiling-bounce compromise entirely.
How loud should I set the surround sound system for a typical movie?
Reference listening level in professional mixing studios is 85 dB SPL at the listening seat, which is louder than most home viewers prefer. A practical home level is 75 to 80 dB during normal scenes, with peaks reaching 90 to 95 dB during action sequences. Your AV receiver's master volume number is relative to its calibration baseline, so trust your ears more than the display number. If dialogue sounds quiet but effects are overwhelming, raise the center channel level by 2 to 3 dB in the receiver's speaker trim settings rather than increasing master volume.